For a long time, my self-hosting setup was a contradiction in terms. I had services running, yes: a media server here, a notes app there, a few containers scattered across whatever machine happened to be available and online. It worked, until it didn’t. A laptop would sleep, a container would fail silently, a network change would orphan a service. Nothing was documented, nothing was monitored, and the word “architecture” was generous for what was really just organized chaos with a few open ports.
This post is about deciding to do it properly.
The goal wasn’t to build something impressive. It was to build something I understood completely, that I could explain to someone else, and that would still be running six months later without requiring me to remember what I had done. That turned out to require real hardware, a real network design, and a willingness to dig into problems I had been successfully avoiding for years.
Why self-host?
The honest answer is that it’s a combination of reasons, and none of them alone would have been enough. Privacy is part of it: I want my files, notes, and home automation data sitting on hardware I own, not in a data center whose retention policies I’ve agreed to but never read. Control is another part: if a service breaks, I want to be the one who fixes it, not waiting on a vendor to acknowledge the issue. Cost is a factor too, though not in the way you might expect. The monthly subscriptions for cloud storage, password managers, note-taking apps, and media services add up quickly, and a one-time hardware investment starts looking reasonable once you run the numbers.
But the real reason, if I’m being honest, is that it forces you to learn. Running a homelab means you cannot avoid understanding networking, DNS, TLS certificates, containerization, and backup strategy. You learn because you have to, and that knowledge transfers everywhere.
A word on who shouldn’t build one: if you need maximum uptime for genuinely critical services, a homelab isn’t the right answer. Consumer hardware fails, power goes out, and you’re the on-call engineer. For anything where downtime is expensive, managed services are still the correct choice.
Choosing the hardware
The philosophy here was to avoid expensive branded gear wherever possible. The networking industry has a well-established tradition of charging a significant premium for hardware that runs on the same commodity silicon as much cheaper alternatives. An N100 mini-PC is not meaningfully different from a purpose-built firewall appliance in terms of capability, and it costs a fraction of the price.
| Component | What I use | Role |
|---|---|---|
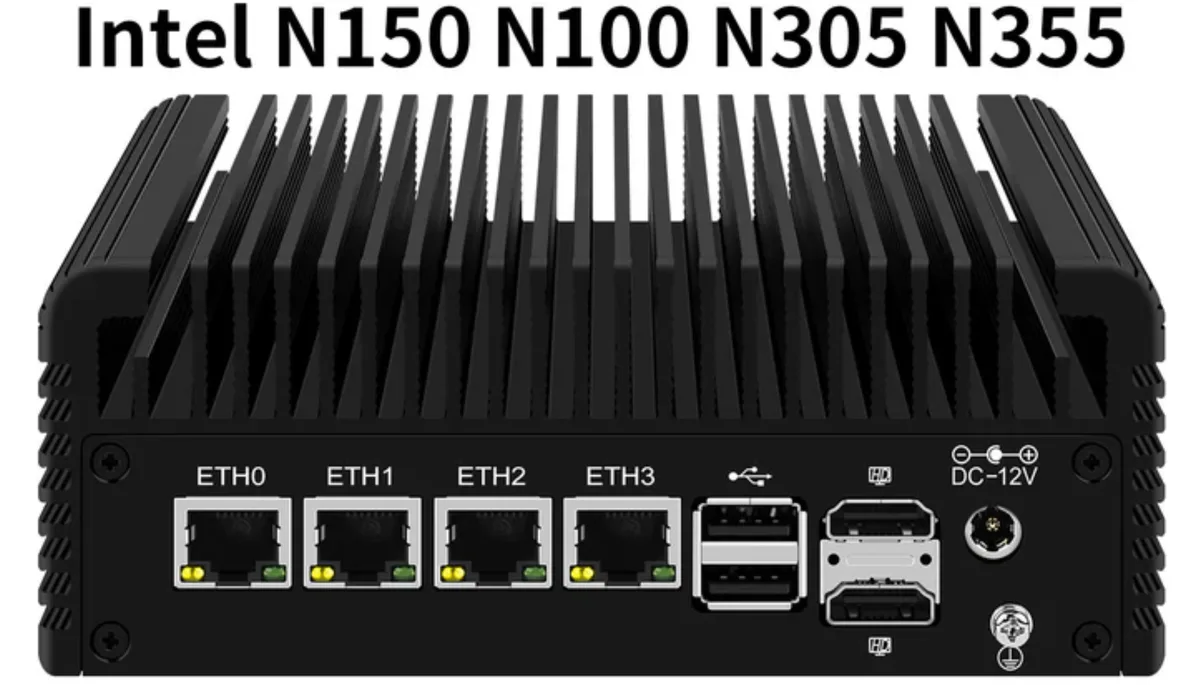
| Firewall/router | Intel N100 mini-PC, 4x 2.5GbE NICs | OPNsense firewall, routing, DNS, DHCP |
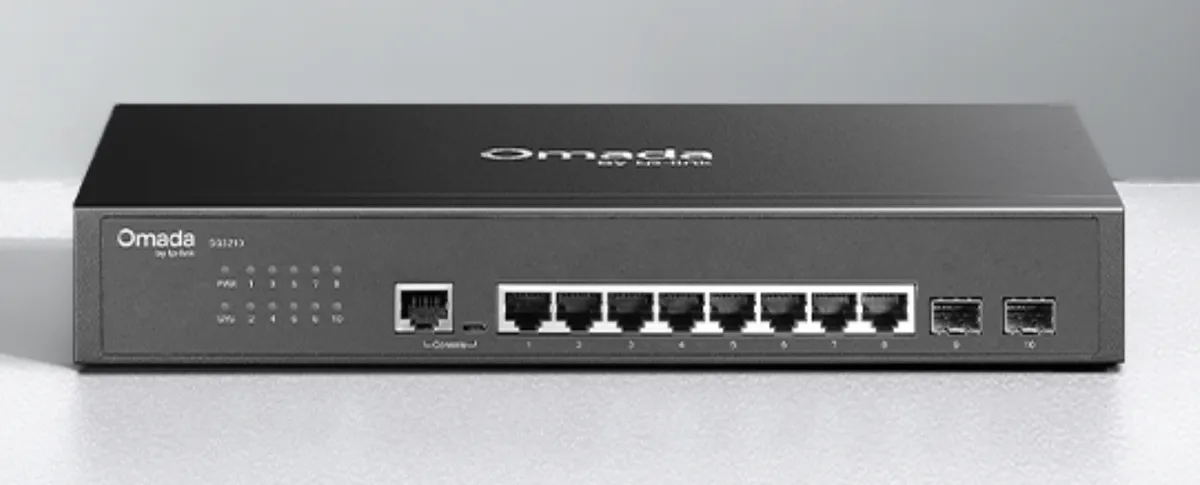
| Switch | TP-Link SG3210, 8-port L2+ managed | VLAN trunking between all devices |
| Access point | TP-Link EAP650, Wi-Fi 6 | Multiple SSIDs, each mapped to a VLAN |
| Hypervisor | 2019 Intel NUC (specced out) | Proxmox VE, hosts all VMs and containers |
Here’s how all of it connects:
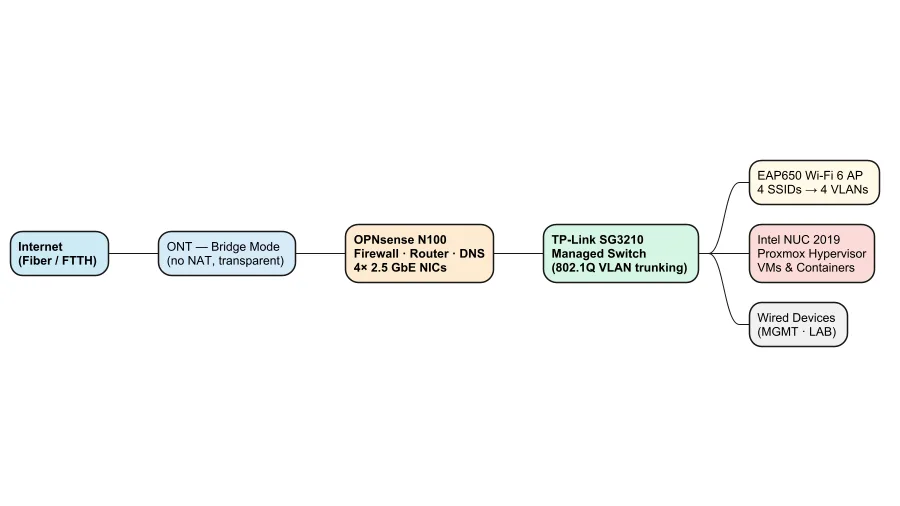
The firewall box. The N100 mini-PC is well-suited here for a few reasons: low power draw, possible passive cooling, four independent 2.5GbE NICs (which matters for clean VLAN trunking), and enough CPU headroom for firewall and IDS tasks. I’m running OPNsense on it, chosen over pfSense for its more active development cadence, cleaner interface, and better plugin ecosystem. If you’re on a tighter budget, any x86 box with two or more NICs works fine as a starting point: an old ThinkPad or a repurposed desktop. If you want to go cheaper, very similar hardware ships directly from China at a significant discount — search for “N100 4-port 2.5GbE mini PC” and you’ll find near-identical units for considerably less.
The switch. This is the one place where you genuinely cannot cut corners. The switch must support IEEE 802.1Q VLAN tagging. An unmanaged switch cannot do VLANs, period. The TP-Link SG3210 is an L2+ managed switch, meaning it understands VLAN tags, supports trunk and access ports, and costs significantly less than comparable Cisco or Ubiquiti hardware. For a homelab with fewer than ten physical devices, eight ports is plenty.
The access point. The EAP650 runs in standalone mode, which means no cloud controller and no phone-home dependency. It supports multiple SSIDs, each of which can be tagged to a different VLAN, which is exactly what you need when you want IoT devices on a separate network segment from your laptops. Standalone mode has fewer features than controller mode, but for a single-AP setup, it covers everything that matters. The EAP650 is ceiling-mounted and powered over Ethernet — the SG3210 has no PoE ports, so you’ll need a PoE injector in between.
The hypervisor. This is a 2019 Intel NUC, specced with more RAM and a fast SSD. The reason it’s physically separate from the firewall box is simple: if you’re updating a VM or the hypervisor itself needs a reboot, you don’t want your network going down with it. The firewall and hypervisor should be independent machines. An old laptop or desktop works equally well for Proxmox; the NUC is compact and quiet, which matters more in a living space than it would in a dedicated server room.
The double NAT problem
Before the network architecture makes sense, there’s a problem that affects a large number of home internet connections and that most people don’t know they have.
The global IPv4 address pool is effectively exhausted. There are not enough addresses to give every subscriber a unique public IP, so many ISPs have responded by deploying Carrier-Grade NAT (CGNAT): your modem gets a private IP from the ISP’s internal network, and the ISP translates that to a shared public IP used by hundreds of other subscribers at the same time. You may believe you have a public IP address. In a CGNAT setup, you don’t.
The consequence for self-hosting is severe. When you configure port forwarding on your home router, you’re forwarding from your router’s private IP to a device on your LAN. But inbound traffic from the internet never reaches your router in the first place, because it’s stopped at the ISP’s NAT layer before it ever gets to you. There is no path from the internet to your home network, regardless of how carefully you configure your router.
The most direct fix involves two things. (If you’d rather not expose a static IP at all, services like Cloudflare Tunnel or Tailscale can punch through CGNAT without one — but that’s a different trade-off, covered separately.) First, contact your ISP and request a static public IP address. Most ISPs offer this as a paid add-on, and the cost is usually modest relative to what it enables. Second, ask them to put your ONT (the fiber termination device, sometimes called a modem) into bridge mode. In bridge mode, the ONT stops performing NAT and routing entirely; it becomes a transparent layer-2 bridge that passes the raw fiber connection directly to whatever is plugged into it. In this setup, that’s OPNsense.
Internet
    |
ONT  [bridge mode: no NAT, no DHCP, transparent pass-through]
    |
OPNsense WAN port
(receives your static public IP directly from ISP)
    |
OPNsense LAN  →  managed switch  →  your network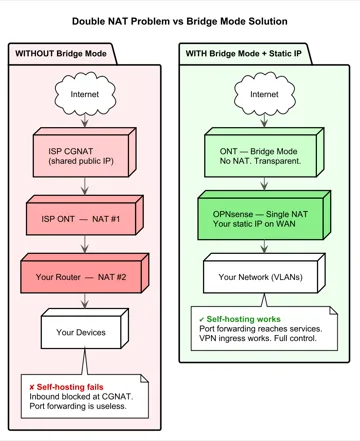
Once this is in place, the OPNsense configuration to get internet working is three steps:
- Create the WAN interface. In OPNsense, go to Interfaces, create a new WAN interface, and assign it to the port physically connected to the ONT’s bridged output. This is the port that carries your FTTH connection into the firewall.
- Add the gateway. Go to System > Routing > Gateways and add a new gateway entry using the static IP, subnet mask, and gateway address your ISP provides alongside your fixed IP allocation. OPNsense will use this to route all outbound traffic.
- Connect LAN to the switch. The remaining port on the N100 becomes your LAN interface, which connects to the managed switch. From there, the switch distributes traffic across your VLANs.
A word of caution before you proceed.
The moment you configure a static public IP on OPNsense’s WAN interface, your firewall is directly reachable from the entire internet. There is no ISP router in front of it acting as a buffer. It is you, and the open internet, with nothing in between.
That is the point — and it is also the risk. Every port you forward, every service you expose, every misconfigured firewall rule is now directly accessible to anyone on the planet. OPNsense is a capable firewall and handles this well when configured correctly, but “configured correctly” is doing a lot of work in that sentence. Before you make this change: audit every firewall rule, ensure nothing is open to inbound traffic from WAN unless you deliberately need it, and verify that your management interfaces are not exposed externally.
If you are not ready to own that responsibility, or if you have no intention of self-hosting anything that requires inbound access, there is nothing wrong with staying behind CGNAT. Double NAT is an obstacle for inbound connections, but it is also a layer of obscurity you lose the moment you get rid of it. Know what you are doing before you take this step.
That’s it. Most ISPs that offer fixed public IPv4 charge a small monthly fee for it — Leaptel, Airtel, Jio, Verizon, and most others price it as an add-on to your standard plan. It’s worth it.
Before purchasing any hardware, verify two things with your ISP: whether they use CGNAT, and whether they can provide a static IP with ONT bridge mode. A quick way to check for CGNAT yourself is to look at the WAN IP your current router receives. If it’s in the 100.64.x.x range, you’re almost certainly behind CGNAT — that range (RFC 6598) is reserved specifically for carrier-grade NAT. A 10.x.x.x or 172.16.x.x–172.31.x.x WAN address also indicates some form of double NAT, though not necessarily CGNAT specifically. Either way, inbound connections won’t reach you.
Network isolation with VLANs
A flat home network is a liability you don’t notice until something goes wrong. On a flat network, every device can reach every other device by default. A compromised IoT device, a smart TV with aggressive firmware, or a guest’s laptop on your Wi-Fi all get the same unrestricted access to your NAS, your home automation system, and your router’s management interface. VLANs solve this by creating logically separate network segments on the same physical hardware.
The managed switch and access point both support 802.1Q VLAN tagging. OPNsense acts as the inter-VLAN gateway and enforces firewall rules between segments.
| VLAN | Name | Who’s on it | Default access |
|---|---|---|---|
| MGMT | Management | Router, switch, AP, hypervisor, reverse proxy | Reaches everything; nothing else reaches it |
| HOME | Home | Trusted laptops, phones, cameras/NVR | HOME, IoT, WAN |
| LAB | Lab | VMs, Docker services, dev machines | Everything |
| GUEST | Guest | Guest Wi-Fi devices | WAN only, fully isolated |
| IoT | IoT | Smart bulbs, sensors, thermostats | WAN where needed; reachable from HOME and LAB |
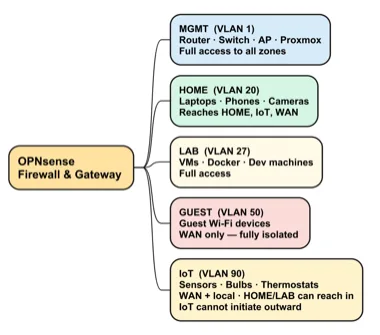
Two of these zones need more explanation, because the rules are not obvious.
MGMT is intentionally locked down. Infrastructure devices live here, and no device in HOME, GUEST, or IoT can initiate connections to the MGMT segment. This means a compromised device on your network cannot reach your router’s management interface or your hypervisor console.
IoT gets a combination of local access and selective WAN access. Smart devices often need the internet for firmware updates or cloud integrations, and that’s fine. What they cannot do is initiate connections to your laptops or servers. The rule runs one way: a controller running on your lab VM can reach IoT devices to read sensors and toggle switches (more on this in the home automation post), but IoT devices cannot reach the LAB or HOME segments on their own initiative. This is enforced at the firewall, not just at the switch.
GUEST is fully isolated. Guest devices get internet access and nothing else. They cannot see each other, and they cannot see anything on your internal network, including other devices on the guest VLAN.
The firewall rules that enforce all of this live in OPNsense and apply regardless of whether a device is connected over Wi-Fi or Ethernet. Physical access to the switch doesn’t grant access to other VLANs.
What comes next
The hardware and network design here is the foundation that makes everything else possible. In the next post, I’ll cover the software stack that runs on top of it: how OPNsense is configured in detail, how Proxmox manages VMs and containers, how Docker and Portainer handle the service layer, and how Nginx Proxy Manager provides HTTPS access to every service via a single wildcard certificate, with split-horizon DNS ensuring that internal URLs resolve correctly without exposing anything to the public internet.
Practical takeaways
Before you buy anything, verify with your ISP:
- Do they use CGNAT? (Check your router’s WAN IP:
100.64.x.xis the CGNAT range;10.x.x.xor172.16–31.x.xalso indicates double NAT of some kind) - Can you get a static public IP?
- Can they put the ONT in bridge mode?
Hardware minimum requirements:
- Firewall box: x86, at least two NICs, 4GB RAM
- Switch: must explicitly support 802.1Q VLAN tagging (verify in the spec sheet, not just the product name)
- Access point: must support multiple SSIDs with per-SSID VLAN tagging
Budget vs. what I use:
| Tier | Firewall | Switch | AP | Hypervisor |
|---|---|---|---|---|
| Budget | Old laptop or desktop with USB NIC | TP-Link TL-SG108E | Old router in AP mode | Any x86 PC |
| What I use | N100 mini-PC, 4x 2.5GbE | TP-Link SG3210 | TP-Link EAP650 | 2019 Intel NUC |
| Premium | Protectli Vault | Cisco SG series | Ubiquiti U6-Pro | Dedicated server |
VLANs to start with: MGMT, IoT, and GUEST cover the most important isolation. Getting IoT devices off your main network is the highest-value change you can make to a home network, and it costs nothing beyond a managed switch you should already have.